Git 学习笔记
一、入门使用
包含操作:
git init:初始化 git 仓库
git add <file>:添加文件
git commit:提交文件
 1
 2
 3
 4
 5
 6
 7
 8
 9
10
11
12
13
| # 1. 创建文件夹
mkdir demo
cd demo
# 2. 初始化 git 仓库
git init
# 3. 新建文件并提交
echo Hello git! >> readme
git add readme
# 4. 提交修改
git commit -m "创建 readme"
|
Commit Message 规范:
为了方便我们对提交信息的查找与使用,我们在编写 commit message 时应该遵循一定的规范,社区有多种 Commit message 的 写法规范,我们主要使用Angular 规范,这是使用最为广泛的规范。
具体的规范要求可以查看:Commit message 和 Change log 编写指南 - 阮一峰的网络日志 (ruanyifeng.com)
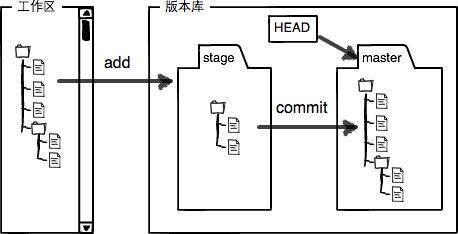
二、工作区和暂存区
我们在电脑中能看到的目录,比如我的demo文件夹就是一个工作区(Working Space)。
在我们的执行 git init命令的路径下,有一个隐藏目录.git,这个目录就算 git 的版本库。
git 的版本库里存了很多东西,其中最重要的就是 **暂存区(stage)**和 git 为我们自动创建的第一个分支master,以及指向master的一个指针叫HEAD。
我们在执行 git add <file>命令时,git 会将我们添加的文件从工作区添加到暂存区,当我们执行 git commit命令时,又会将文件添加到分支中:
下面我们通过实践观察 git 的工作流程:
 1
 2
 3
 4
 5
 6
 7
 8
 9
10
11
12
13
14
15
16
17
18
19
20
21
22
23
24
25
26
27
28
29
30
| # 1. 在工作区修改 readme 文件并查看状态
echo test >> readme
git status
output:
On branch master
Changes not staged for commit:
(use "git add <file>..." to update what will be committed)
(use "git restore <file>..." to discard changes in working directory)
modified: readme
no changes added to commit (use "git add" and/or "git commit -a")
# 2. 添加文件到暂存区
git add readme
git status
output:
On branch master
Changes to be committed:
(use "git restore --staged <file>..." to unstage)
modified: readme
# 3. 提交文件到分支
git commit -m "test"
git status
output:
On branch master
nothing to commit, working tree clean
|
三、撤销修改
包含操作:
git restore:撤销修改
当我们在工作区修改了文件后,如果我们想撤销修改,回退到之前的版本,那么我们可以使用 git restore命令进行撤销:
 1
 2
 3
 4
 5
 6
 7
 8
 9
10
11
12
13
14
15
16
| # 1. 修改文件
echo study >> readme
cat readme
output:
Hello git!
test
study
# 2. 撤销修改
git restore readme
cat readme
output:
Hello git!
test
|
如果我们执行了 git add操作后,我们想要撤销修改,那么我们也可以使用git restore命令进行撤销:
 1
 2
 3
 4
 5
 6
 7
 8
 9
10
11
12
13
14
15
16
17
18
19
20
21
22
23
24
25
26
27
28
29
30
31
| # 1. 修改文件
echo study >> readme
cat readme
output:
Hello git!
test
study
# 2. 提交到暂存区
git add readme
git status
output:
On branch master
Changes to be committed:
(use "git restore --staged <file>..." to unstage)
modified: readme
# 3. 撤销修改
git restore --staged readme
git status
output:
On branch master
Changes not staged for commit:
(use "git add <file>..." to update what will be committed)
(use "git restore <file>..." to discard changes in working directory)
modified: readme
no changes added to commit (use "git add" and/or "git commit -a")
|
四、远程仓库
包含操作:
git remote:管理远程仓库
git push:将分支推送到远程仓库
git pull:将远程分支拉到本地
五、分支管理
分支管理是 git 中最为强大的工具,通过分支管理可以帮助我们实现多人协同工作。
1. 分支创建与合并
git 为我们默认创建的分支为 master分支,当我们在开发新功能时,我们可以新建一个分支,然后将我们的修改提交到新分支,当我们功能开发完毕后再合并到主分支即可:
 1
 2
 3
 4
 5
 6
 7
 8
 9
10
11
12
13
14
15
16
17
18
19
20
21
22
23
24
25
26
27
28
29
30
31
| # 1. 创建并切换到新分支
git checkout -b newBranch
# 这一步实际上是执行了两个操作
# git branch newBranch # 创建新分支
# git checkout newBranch # 切换到新分支
# 2. 在新分支进行修改
echo newBranch >> readme
git add readme
git commit -m "newBranch"
# 3. 切换回 master 分支
git checkout master
cat readme
output:
Hello git!
test
study
# 此时我们可以发现在新分支做的修改是没有影响到主支的
# 4. 合并新分支到主支
git merge newBranch
cat readme
output:
Hello git!
test
study
newBranch
# 新分支的修改已经合并到主分支了
|
2. 合并冲突
在分支合并时,git 会自动对两个分支的内容进行合并。但是有些时候 git 无法完成两个内容的合并,这个时候就会产生冲突。
 1
 2
 3
 4
 5
 6
 7
 8
 9
10
11
12
13
14
15
16
17
18
19
20
21
22
23
24
25
26
27
28
29
30
31
32
33
34
35
36
37
38
39
40
41
42
43
44
45
46
47
48
49
50
51
52
53
54
55
56
57
58
59
| # 1. 对 master 分支的 readme 文件进行修改
cat readme
output:
Hello git!
master
git add readme
git commit -m "master"
# 2. 对 newBranch 分支的文件进行修改
git checkout newBranch
cat readme
output:
Hello git!
newBranch
git add readme
git commit -m "newBranch"
# 3. 切换回 master 分支进行合并
git checkout master
git merge newBranch
output:
Auto-merging readme
CONFLICT (content): Merge conflict in readme
Automatic merge failed; fix conflicts and then commit the result.
# 查看状态
git status
output:
On branch master
You have unmerged paths.
(fix conflicts and run "git commit")
(use "git merge --abort" to abort the merge)
Unmerged paths:
(use "git add <file>..." to mark resolution)
both modified: readme
no changes added to commit (use "git add" and/or "git commit -a")
# 直接查看 readme 文件的内容
catreadme
Hello git!
<<<<<<< HEAD
master
=======
newBranch
>>>>>>> newBranch
# git 为我们标注出了冲突的位置
# 4. 我们对 readme 文件直接进行修改,修改完成后直接提交即可
git add readme
git commit -m "Handling conflicts"
|
3. 状态暂存
我们在使用虚拟机的时候有一个快照功能,我们可以使用它为我们保存虚拟机的快照。当我们虚拟机使用出现问题时,直接恢复快照就可以恢复到原来的状态。
git 也有类似于虚拟机快照的功:git stash命令可以保存当前状态和恢复历史状态。
 1
 2
 3
 4
 5
 6
 7
 8
 9
10
11
12
13
14
15
16
17
18
19
20
21
22
23
24
25
26
27
28
29
30
31
32
33
34
35
36
37
38
39
40
41
42
43
44
45
46
47
| # 1. 修改文件
echo stash >> readme
# 2. 查看当前状态
git status
output:
On branch master
Changes not staged for commit:
(use "git add <file>..." to update what will be committed)
(use "git restore <file>..." to discard changes in working directory)
modified: readme
no changes added to commit (use "git add" and/or "git commit -a")
# 3. 保存当前状态
git stash
git status
output:
On branch master
nothing to commit, working tree clean
# 4. 查看保存的状态
git stash list
output:
stash@{0}: WIP on master: 84e21d9 Merge branch 'newBranch'
# 5. 恢复状态
git stash pop stash@{0}
# 该命令实际上是执行了两步:
# git stash apply stash@{0}
# git stash drop stash@{0}
# 6. 查看当前状态
git status
output:
On branch master
Changes not staged for commit:
(use "git add <file>..." to update what will be committed)
(use "git restore <file>..." to discard changes in working directory)
modified: readme
no changes added to commit (use "git add" and/or "git commit -a")
# 可以发现我们之前保存的状态已经恢复了
|
六、Git Hooks
Git Hooks 是我们在执行某些 git 操作时可以触发的脚本。有了这些脚本可以更帮助我们更方便的进行生产。
git hooks 位于 .git/hooks/目录下,如果我们要想启用某个钩子,将钩子文件名改为正确的后缀即可。下面我们尝试写一个 commit-msg (在 commit 操作前触发)的 hook:
 1
 2
 3
 4
 5
 6
 7
 8
 9
10
11
12
13
14
15
16
17
18
19
20
21
22
23
24
25
26
27
28
29
30
| # 1. 进入目录
cd .git/hooks/
ls
output:
applypatch-msg.sample post-update.sample pre-push.sample push-to-checkout.sample
pre-applypatch.sample pre-rebase.sample update.sample
commit-msg.sample pre-commit.sample pre-receive.sample
fsmonitor-watchman.sample pre-merge-commit.sample prepare-commit-msg.sample
# 2. 备份 commit-msg.sample 文件
mv commit-msg.sample commit-msg.sample.bak
# 3. 编写一个 bash 脚本
vim commit-msg
#!/bin/sh
echo "using hooks!"
# 4. 测试
cd ../../
echo hook >> readme
git add readme
git commit -m "hooks"
output:
using hooks!
[master bc3f277] hooks
1 file changed, 2 insertions(+)
# 可以发现我们的钩子被正确执行了
|
想了解更多钩子的用户可以参看:githooks(5) (kernel.org)